Powered by Blogger.
Showing posts with label Blogger Guides. Show all posts

Essential Conditional Tags For Blogger


There are a few tricks to hide elements from the blogger blog, You can hide elements in the homepage, posts, and static pages  by adding conditional tags.

here are some essential conditional tags for you to hide your elements

Showing widget only on the home page:
<b:widget id='HTML1' locked='false' title='Recent Posts' type='HTML'>
<b:includable id='main'>
<b:if cond='data:blog.url == data:blog.homepageUrl'>
<!-- only display title if it's non-empty -->
<b:if cond='data:title != ""'>
<h2 class='title'><data:title/></h2>
</b:if>
<div class='widget-content'>
<data:content/>
</div>
<b:include name='quickedit'/>
</b:if>
</b:includable>
</b:widget>
View the widget only on post pages:
<b:widget id='HTML1' locked='false' title='Recent Posts' type='HTML'>
<b:includable id='main'>
<b:if cond='data:blog.pageType == "item"'>
<!-- only display title if it's non-empty -->
<b:if cond='data:title != ""'>
<h2 class='title'><data:title/></h2>
</b:if>
<div class='widget-content'>
<data:content/>
</div>
<b:include name='quickedit'/>
</b:if>
</b:includable>
</b:widget>
Displays widgets only on specific pages:
<b:widget id='HTML1' locked='false' title='Recent Posts' type='HTML'>
<b:includable id='main'>
<b:if cond='data:blog.url == "URL of the page"'>
<!-- only display title if it's non-empty -->
<b:if cond='data:title != ""'>
<h2 class='title'><data:title/></h2>
</b:if>
<div class='widget-content'>
<data:content/>
</div>
<b:include name='quickedit'/>
</b:if>
</b:includable>
</b:widget>
Note: Change your URL in the address you want. 

Hiding widgets only on specific pages:
<b:widget id='HTML1' locked='false' title='Recent Posts' type='HTML'>
<b:includable id='main'>
<b:if cond='data:blog.url != " URL of the page "'>
<!-- only display title if it's non-empty -->
<b:if cond='data:title != ""'>
<h2 class='title'><data:title/></h2>
</b:if>
<div class='widget-content'>
<data:content/>
</div>
<b:include name='quickedit'/>
</b:if>
</b:includable>
</b:widget>
Displaying widgets on the static page:
<b:widget id='HTML1' locked='false' title='Recent Posts' type='HTML'>
<b:includable id='main'>
<b:if cond='data:blog.pageType == "static_page"'>
<!-- only display title if it's non-empty -->
<b:if cond='data:title != ""'>
<h2 class='title'><data:title/></h2>
</b:if>
<div class='widget-content'>
<data:content/>
</div>
<b:include name='quickedit'/>
</b:if>
</b:includable>
</b:widget>
Hide the widget on a static page:
<b:widget id='HTML1' locked='false' title='Recent Posts' type='HTML'>
<b:includable id='main'>
<b:if cond='data:blog.pageType != "static_page"'>
<!-- only display title if it's non-empty -->
<b:if cond='data:title != ""'>
<h2 class='title'><data:title/></h2>
</b:if>
<div class='widget-content'>
<data:content/>
</div>
<b:include name='quickedit'/>
</b:if>
</b:includable>
</b:widget>
widget displays only on archive pages:
<b:widget id='HTML1' locked='false' title='Recent Posts' type='HTML'>
<b:includable id='main'>
<b:if cond='data:blog.pageType == "archive"'>
<!-- only display title if it's non-empty -->
<b:if cond='data:title != ""'>
<h2 class='title'><data:title/></h2>
</b:if>
<div class='widget-content'>
<data:content/>
</div>
<b:include name='quickedit'/>
</b:if>
</b:includable>
</b:widget>
After you add the conditional tags above, save the template and view the results. This conditional tags not limited to the widgets, with the help of conditional tags you can wrap the other elements such as Script, CSS, and HTML. 

That's it! I hope you like this article! Stay tuned for more cool articles!

How To Install SEO Smart Links in Blogger


How to Install SEO Smart Links in Blogger - This time, Smartpik will share SEO Smart Links plugin for Blogger, Actually, this is a WordPress plugin that changes any given word in an article into a link.

This plugin will read every word specified in the article. For example, if you add word smartphone or computer, then automatically every time the word will turn into a link and only then if in your blog article contained that word.

How to Install SEO Smart Links

As usual Go to Blogger dashboard and select the Template section and click Edit HTML. Then add the following code before </body> tag
<script type='text/javascript'>
function smartLink(){
    this.keywdHref = new Object();
    this.add = function(keyword, href){
        if(keyword.substr(0,1) != &quot; &quot;){keyword = &quot; &quot; + keyword;}
        this.keywdHref[keyword] =  href;
    }
    this.createAnchor = function(){
        var objs = document.getElementsByTagName(&quot;div&quot;);
        for(var i=0; i&lt;objs.length; i++){
            var obj = objs[i];
            if(obj.className.indexOf(&quot;post-body&quot;)&gt;-1){
                var content = obj.innerHTML;
                for(var keyword in this.keywdHref){
                    var href = this.keywdHref[keyword];
                    var newstr = content.replace(keyword, &quot;&lt;a href=&#39;&quot;+href+&quot;&#39;&gt;&quot;+keyword+&quot;&lt;/a&gt;&quot;, &quot;gi&quot;);
                    obj.innerHTML = newstr;
                    content = newstr;
                }
            }
        }
    }
    this.startScript = function(){
        var onLoad = window.onload;
        window.onload = function(){
            if(onLoad){onLoad();}
            setTimeout(&quot;f.createAnchor()&quot;, 100);
        }
    }
}
</script>
<script type='text/javascript'>
var f = new smartLink();
f.add(&quot;smartphone&quot;, &quot;http://www.smartpik.in/search/label/smartphone&quot;);
f.startScript();
</script>
If you want this plugin only appears on post pages or any specific pages, please add conditional tags. Reference post: Essential Conditional Tags For Blogger

On the highlighted code, replace smartphone with your own keyword and replace the highlighted URL http://www.smartpik.in/search/label/smartphone with your blog URL.

In the above you can add other keywords like below, for example
f.add(&quot;SEO&quot;, &quot;http://www.smartpik.in/search/label/SEO&quot;);f.add(&quot;Template&quot;, &quot;http://www.smartpik.in/search/label/Template&quot;);f.add(&quot;Blogger&quot;, &quot;http://www.smartpik.in/search/label/Blogger&quot;);
You can also add words into bold, for example
f.add(&quot;&lt;b&gt;Blogger&lt;/b&gt;&quot;, &quot;http://www.smartpik.in/search/label/Blogger&quot;);
Click on the Result button to watch live demo, Note the word smartphone on the demo article:
That's it! I hope you like this article! Stay tuned for more cool articles!

How To Solve OpenID Related Errors In Blogger


How To Solve OpenID Related Errors In Blogger - Actually, maybe for some bloggers commented with OpenID or anonymous for now rarely used. 

Well, here I was curious and tried to re-activate the comment with OpenID. After I turn on and test the comments turned out to find an error message " Whoops, that's an error OpenID ". After my googling  and found the solution, now with OpenID comments may reappear without an error message as before, want to know how? 

Please follow the below steps:

First, you register an OpenID in Stackexchange by entering your data. Once the registration is complete, you will get a confirmation via email. 

The next step, open Blogger > Template > Edit HTML > Copy the code below and apply it immediately after the <head> tag
<Link rel = "openid2.provider" href = "https://openid.stackexchange.com/openid/provider" /><Link rel = "openid2.local_id" href = "https://openid.stackexchange.com/user/YOUR-ID" />
Then replace the highlighted ID with YOUR-ID that has been registered in StackExchange. 

Save the template and you're done. By applying the tips above, now you can comment with OpenID on your blog or other blogs.

That's it! I hope you like this article! Stay tuned for more cool articles!

Automatic Image Optimization in Blogger For SEO


How to Optimize Images in Blogger Automatically For SEO - This is done so that the images on your blog pages indexed automatically by the search engines like google so you are not bothered by adding it manually (add a description in the <img alt = "description of the image" height = "125" scr = "/ image.png" width = "125" /> when posting pictures).

The way it can be said to be a hassle. With this automatic way, each image has the same description with the title picture. Therefore, you have to give them appropriate names for each picture to be posted. 

Why Automatic Image Optimization For SEO? Because the image on the blog page is one medium that can be used for traffic on the search engines because the majority of internet users are very likely to seek or just browsing to see the pictures. 

Here's how to install automated image optimization in your blog template, As usual, go to your blogger dashboard > then go to the template section and click edit HTML then copy and paste the below code just before the </body> tag
<script type='text/javascript'>
//<![CDATA[
$(document).ready(function() {
$('img').each(function(){
var $img = $(this);
var filename = $img.attr('src')
$img.attr('alt', filename.substring((filename.lastIndexOf('/'))+1, filename.lastIndexOf('.')));
});
});
//]]>
</script>
<script type='text/javascript'>
//<![CDATA[
$(document).ready(function() {
$('img').each(function(){
var $img = $(this);
var filename = $img.attr('src')
$img.attr('title', filename.substring((filename.lastIndexOf('/'))+1, filename.lastIndexOf('.')));
});
});
//]]>
</script>
<script type='text/javascript'>
//<![CDATA[
var scrollTimer = null;
$(window).scroll(function() {
   var viewportHeight = $(this).height(),
       scrollbarHeight = viewportHeight / $(document).height() * viewportHeight,
       progress = $(this).scrollTop() / ($(document).height() - viewportHeight),
       distance = progress * (viewportHeight - scrollbarHeight) + scrollbarHeight / 2 - $('#scroll').height() / 2;
    $('#scroll')
        .css('top', distance)
        .text(' (' + Math.round(progress * 100) + '%)')
        .fadeIn(100);
    if (scrollTimer !== null) {
        clearTimeout(scrollTimer);
    }
    scrollTimer = setTimeout(function() {
        $('#scroll').fadeOut();
    }, 1500);
});
//]]>
</script>
Then save the template. Now any image that you are installed on your blog that has an automatically generated SEO friendly code. 

Thanks for reading! Stay tuned for more blogger tricks!

How to Redirect old Blog URLs to New URLs


Today I'm going to how to Redirect Blog Old URL to New Blog. This method is useful for those who have just moved domain or create a new blog and you want to redirect visitors from old blog that already have a source of traffic from organic search results. 

So how? Ok, here I give 3 different ways to redirect blog URL to other blogs. The first way is by applying the javascript code to your blog template, login to Blogger > Template > Open and click edit HTML > apply the below code just after the <head> tag.
<script type='text/javascript'>
  var d='<data:blog.url/>';
  d=d.replace(/.*\/\/[^\/]*/, '');
  location.href = 'http://smartpik.blogspot.com';
</script>
In the above javascript code is written link destination is http://smartpik.blogspot.com, please replace the destination link with your blog. 

The second method is also using the javascript code and the application does not differ from the codes of the way first. apply the below code just after the <head> tag.
<script>
if(window.location.href == 'http://yourblog.blogspot.com')
{
window.location="http://smartpik.blogspot.com";
}
</script>
Replace the first highlighted URL with your any URL(includes home, posts, and pages) And the second URL is the destination.

And for the third way to use the application of meta refresh tag in the blog template. apply the below code just after the <head> tag.
<meta content='5;url=http://smartpik.blogspot.com' http-equiv='refresh'/>
Content = 5 above the lag time required when a blog URL diverted to other blogs. Replace the time with your taste.

Thanks for reading! Stay tuned for more blogger tricks!

How to Block Spam Comments in Blogger


There are several reasons for you wants to block a commenter in a blog who frequently posts comments that are considered unethical, abusive, and defamatory.

These comments which contain an invitation in the form of links, hoping for visited links entered into the comments. to avoid these things, you need to enter a specific code into your blog template. Here's how the application works:

The first way with jQuery

Go to Blogger> Template> Edit HTML> Add the following code before the </ body>
<script type='text/javascript'>//<![CDATA[ var spamlist=[ 'http://www.blogger.com/profile/xxxxx', /* url of the commenter */ 'http://nama_blog.blogspot.com/xxxxx', 'http://www.blogger.com/profile/xxxxx' /* last url does not need a comma */];for(var v=0; v<spamlist.length; v=v+1){ $("a[href='"+spamlist[v]+"']").each(function(){ $(this).closest(".comment-block").find(".comment-content") .replaceWith("<div class='comment-content' style='color:red'>You have been banned! Please leave this blog!</div>"),     $(this).replaceWith("<span style='color:red'>BANNED USER!</span>");
For those who use templates to hack commenting system, could use this code
<script type='text/javascript'>//<![CDATA[ var spamlist=[ 'http://www.blogger.com/profile/xxxxx', /* url of the commenter */ 'http://www.blogger.com/profile/xxxxx', 'http://www.blogger.com/profile/xxxxx' /* last url does not need a comma */];for(var v=0; v<spamlist.length; v=v+1){ $("a[href='"+spamlist[v]+"']").each(function(){ $(this).closest(".comment_inner").find(".comment_body") .replaceWith("<div class='.comment_body' style='color:red'>You have been banned! Please leave this blog!</div>"),     $(this).replaceWith("<span style='color:red'>BANNED USER!</span>"); })}//]]></script>
Replace highlighted URLs and texts with your taste. And save the template.

How to do with Conditional tags

Go to Blogger> Template> Edit HTML> Find the code below
<b:loop values='data:post.comments' var='comment'>
Then add this code below the above code
<!--blacklist--><b:if cond='data:comment.authorUrl != &quot;http://www.blogger.com/profile/xxxxx&quot;'><!--blacklist-->
Change http://www.blogger.com/profile/xxxxx with URL will be banned. After you get this code </b:loop> , and add this below code before it:
<!--blacklist-->  </b:if><!--blacklist-->
That's it! Save the template. Thanks for reading!

All In One SEO Pack Plugin For Blogger


Add new updated and modified all in one SEO (Search engine optimization) pack plugin in your blog -  As you already know guys the actual importance of SEO, because if you want to become a professional blogger, then it's very important for you to learn everything about SEO. Without doing a proper Search Engine Optimization no one can get ranked on Search Engines, it is useless to start a blog without doing any SEO.

On Google - "the process of maximizing the number of visitors to a particular website by ensuring that the site appears high on the list of results returned by a search engine".

So this tutorial is for every newbie who is unaware from this SEO plugin, now you can add this updated all in one SEO pack plugin in your Blogspot blog to improve the ranking of your website on all Major Search Engines such as Google, Bing, Yahoo etc.

This all in one SEO pack plugin is specially designed for Blogspot platform and you can trust on this plugin blindly because this plugin is 100% safe and it will help you to get more organic traffic from search engine. So if you are ready and want to install this plugin in your own blog then simply follow the below steps. 

Features Of All In One Plugin
  • Add Meta Tags in Your Blogger Blog.
  • Verify Google, Bing, and Alexa by verification code
  • Add an SEO Friendly Robots.txt File
  • Google + Author Profile Picture Compatible
  • Facebook and Twitter Profile Compatible
  • SEO Optimize Blogger Comments
  • Optimize Post Title Using H2 Tag

How To Setup All In One SEO Pack Plugin?

First go to your blogger dashboard, Now go to "Template" section and then click on the "Edit Html" button.

Now in the template editor find the below code by pressing "Ctrl + F" key together from your stylish keyboard. 
<head>
After that copy the below code and paste it just after <head>
<meta charset='utf-8'/><meta content='width=device-width, initial-scale=1' name='viewport'/><meta content='blogger' name='generator'/><meta content='text/html; charset=UTF-8' http-equiv='Content-Type'/><link href='http://www.blogger.com/openid-server.g' rel='openid.server'/><link expr:href='data:blog.homepageUrl' rel='openid.delegate'/><link expr:href='data:blog.url' rel='canonical'/><b:if cond='data:blog.pageType == "index"'><title><data:blog.pageTitle/></title><b:else/><b:if cond='data:blog.pageType != "error_page"'><title><data:blog.pageName/> - <data:blog.title/></title></b:if></b:if><b:if cond='data:blog.pageType == "error_page"'><title>Page Not Found - <data:blog.title/></title></b:if><b:if cond='data:blog.pageType == "archive"'><meta content='noindex' name='robots'/></b:if><b:if cond='data:blog.searchLabel'><meta content='noindex,nofollow' name='robots'/></b:if><b:if cond='data:blog.isMobile'><meta content='noindex,nofollow' name='robots'/></b:if><b:if cond='data:blog.pageType != "error_page"'><meta expr:content='data:blog.metaDescription' name='description'/><b:if cond='data:blog.homepageUrl != data:blog.url'><meta expr:content='data:blog.pageName + ", " + data:blog.pageTitle + ", " + data:blog.title' name='keywords'/></b:if></b:if><b:if cond='data:blog.url == data:blog.homepageUrl'><meta content='Blogging Tools, Blogger Tutorial, jQuery, CSS, HTML, JavaScript, Widget, Web Tools, Widgets Tips and Trick' name='keywords'/></b:if><link expr:href='data:blog.homepageUrl + "feeds/posts/default"' expr:title='data:blog.title + " - Atom"' rel='alternate' type='application/atom+xml'/><link expr:href='data:blog.homepageUrl + "feeds/posts/default?alt=rss"' expr:title='data:blog.title + " - RSS"' rel='alternate' type='application/rss+xml'/><link expr:href='"http://www.blogger.com/feeds/" + data:blog.blogId + "/posts/default"' expr:title='data:blog.title + " - Atom"' rel='alternate' type='application/atom+xml'/><b:if cond='data:blog.pageType == "item"'><b:if cond='data:blog.postImageThumbnailUrl'><link expr:href='data:blog.postImageThumbnailUrl' rel='image_src'/></b:if></b:if><link href='/favicon.ico' rel='icon' type='image/x-icon'/><link href='https://plus.google.com/+smartpikin/about' rel='author'/><link href='https://plus.google.com/+smartpikin/posts' rel='publisher'/><link href='https://plus.google.com/xxxxx' rel='me'/><meta content='GOOGLE VERIFICATION CODE' name='google-site-verification'/><meta content='BING VERIFICATION CODE' name='msvalidate.01'/><meta content='ALEXA VERIFICATION CODE' name='alexaVerifyID'/><meta content='global' name='distribution'/><meta content='1 days' name='revisit'/><meta content='1 days' name='revisit-after'/><meta content='document' name='resource-type'/><meta content='all' name='audience'/><meta content='general' name='rating'/><meta content='all' name='robots'/><meta content='en-us' name='language'/><meta content='USA' name='country'/><meta content='@Facebook Id' property='fb:admins'/><meta content='@Twitter Id' name='twitter:site'/>
Now replace the highlighted text with your own Id or code after that click on the orange save template button to apply these changes.

That's it! I hope you like this all in one SEO plugin! Stay tuned for more cool updates!

Add Links To Detect Adblock On Blogger Blog Using JavaScript


How to Add Links to Detect Adblock with JavaScript - If you want to know whether visitors on your blog blocking Google AdSense ads or not, you can do so by adding a JavaScript code. 

This JavaScript automatically detects if any of your site visitor using an Adblock extension enabled browser, Then it brings a special message to your blog visitor. This JavaScript code supports the new format of the data Asynchronous Responsive Google Adsense ads. 

The code is also quite light, so you do not have to worry if the code is going to weigh on the loading speed of your blog. For those who want to try please follow these steps:

Login to Blogger> Open Template Editor> Then add the following code before </ body>
<script type='text/javascript'>
//<![CDATA[
// Adblock Detected
window.onload=function(){setTimeout(function(){var e=document.querySelector("ins.adsbygoogle");e&&0==e.innerHTML.replace(/\s/g,"").length&&(e.style.cssText="color:rgba(0,0,0,0.5);font-weight:700;font-size:110%;padding:20px;margin:auto;text-align:center;text-decoration:none;display:block!important;background:rgba(0,0,0,0.02);border:1px solid rgba(0,0,0,0.08)",e.innerHTML="It seems that you block Google AdSense ads on your browser")},2e3)};
//]]>
</script>
There are two highlighted codes, one is the CSS of the Displaying message and the second one is the displaying message. You can modify these two codes according to your taste.

Save your template, then check your blog after enabling an Adblock extension to your browser and ensure that the code is going well.

That's it! I hope you like this Tip! Stay tuned for more blogger Widgets and Tips!

How To Setup Custom Robots Header Tags in Blogger


Custom Robots Header Tags is a best SEO optimization tool available on the web. Custom Robots Header Tags are playing best roll to improve the search result and gain some extra traffic from search engine. In this time every bloggers are doing lots of hard work to improve his blog traffic. But the work, does not end here. Both of us are working on it. The blogger’s developer’s team is also working hard to improve its features and usability. If you are a new blogger and you don't know anything about this tool. So don't worry, today I'm going to tell you everything about this tool. Custom robots header tags is a handy tool which helps us to select which portion of our blog should be indexed and which should be protected from indexing in search results. Now If you want to setup this tool on your blog, then follow the below instructions.

First go to your blogger dashboard, Now go to the "Setting" and then select "Search preferences".

Click on edit link under the Custom Robots Header Tags section as shown in below screenshot.


Now click on "Yes".

Once you click on the "Yes" then you will see many options. Simply tick on the options as shown in the below image.


When you are finished simply click on orange "Save changes" button to make changes.
 Value
Description
 All
Allow search engines to index the entire contents of the page and blog.
 Noindex
Do not allow search engines to display the page in search results and do not show the "Cached" link in search results.
 Nofollow
This tag does not allow the search engines to follow the links on this page.
 None
This tag has a value equivalent to tag noindex, nofollow.
 Noarchive
Do not allow search engines to show a "Cached" link in search results.
 Nosnippet
Search engines are not allowed to show the snippet description in search results for this page.
 Noodp
This tag does not allow search engines to use metadata from the Open Directory Project for the title or snippet shown for this page.
 Notranslate
Search engines are not allowed to offer a translation of this page in search results.
 Noimageindex
Images contained on this page, are not allowed to index by search engines
 Unavailable  after
The page will not appear in search results after the date / time specified. The date / time must be specified in RFC 850 format.
That's it! I hope you like this Trick! Stay tuned for more blogger widgets, tips and trick!

Dynamic Ways To Increase Blog Traffic


How to drive more traffic to your newly created blog within a few days - At the present time every blogger wants to drive more traffic to their blog. Because if you have a good traffic to their blog then you can earn a good income from your blog. So if you are a new blogger and want to learn how to get genuine traffic, then you are at right place because today with the help of this article we are going to how we can drive more traffic to their blog within a few days. Today I'm going to share with you 11 dynamic ways to increase your blog traffic. If you ready, then read the below points.

Don't Copy/Paste, Always Write Quality Content.

At this time, so many bloggers are doing this major mistake. A quality content is more attractive comparing to copy/paste. So friends, keep in mind and never do this kind of work. As for as possible, always think about to write a quality content. Always publish a quality content to your readers. (While writing an article should not think like an admin always think like a visitor).

Post Comments On Other Blogs.

Doing Comments on any other blog is also good for making some extra free backlinks. But keep in mind always make comments on that blog which is related to your own blog niche. (e.g. If you have a discount/coupon related blog, then only comment on promo/coupons related blog.)

Use Social Media Plugins

It's my suggestion to you guys if you are a new blogger, then always use social media plugins/buttons on your blog. Because at this time it's helping everyone to drive more traffic to your blog. (You can get some cool social media widgets from below links.)

Do Guest Posting

Guest posting is also good for every new blogger. The reason I'm saying to you because if you are writing a quality content on some other blog, then it will help to drive more traffic to your blog. Simply add your own blog URL on that article and let them know about your blog.

Image Optimization

Before publishing your article keep in mind. "don't forget to optimize all your images".

Use Responsive Templates

As far as possible make your blog template responsive. A responsive and mobile friendly template is good for grow up your audience. You can get some responsive, seo ready and mobile friendly templates by clicking on the below link.

Advertising

If you have some extra cash, then advertising on Google Adwords or Facebook is also good to drive more traffic to your blog. You can also advertise your website using the Stumbleupon ads – If anyone like your ad, then you can get more free traffic.

Finding Keywords

Find a high CPC keyword for your blog by using this keyword research tool. It's a free one provided by Google.

Make Some Video Post

Create a YouTube channel and make some video posts because video Blogging is a great way to go viral.

Always Be Inspiring

The best one is, tell your audience about overcoming adversity, or the mindset necessary to do so. Encourage them to keep trying, or set up a challenge that they can use as motivation to complete something important. (At the last I want to say "blogging is incredible".)

That's it! I hope you like this tips! Stay tuned for more blogging tips and tutorials! Thanks You!

How to Start a Blog on Blogger


Nowadays, More and more people want to start a blog for sharing their knowledge, increase the social popularity or to earn money by sitting at home. Some of the people by the servers & and blogging scripts at starting without knowing about anything. This may cause the loss of the money by the users and as we all know that blogging is the continuous process for the a serious blogger, some people left blogging because of they only want to earn money out of it, they don’t want to add the quality content on the website. These types of blogs and shut down very fast as their main focus is on earning money.

Blogspot is a great tool to start a blog for free, this could also help you to know how your interest remains after some time of blogging. This is a free service and also give some auto SEO functions as it is the product of google itself. In this post, you can learn how to start a blogging with Blogspot for free.

Starting Steps

1. First of all, choose a particular topic which you want to post. Think about your interest and stick to a one dedicated topic on which you want to blog.

2. Choose and shortlist your domain names which represent your blog category. Select the best possible domain name which showcase your blog and which is easy to remember.

Now if you are starting blogging, you need a blogging platform interface where you can post your article without interaction of coding.

There are many platforms from which you can start your blogging journey. Some are paid like wordpress.org in which you need your own server to run ,and some are also free like blogspot.com by google, wordpress.com etc.

Creating Blog with Blogspot.com

We start with the blogspot.com , as it is very easy to start with at beginning the stage of blogging.

1. Go to blogger.com

2. Login with your gmail id

3. Now click to New Blog button, at the left side of the screen.

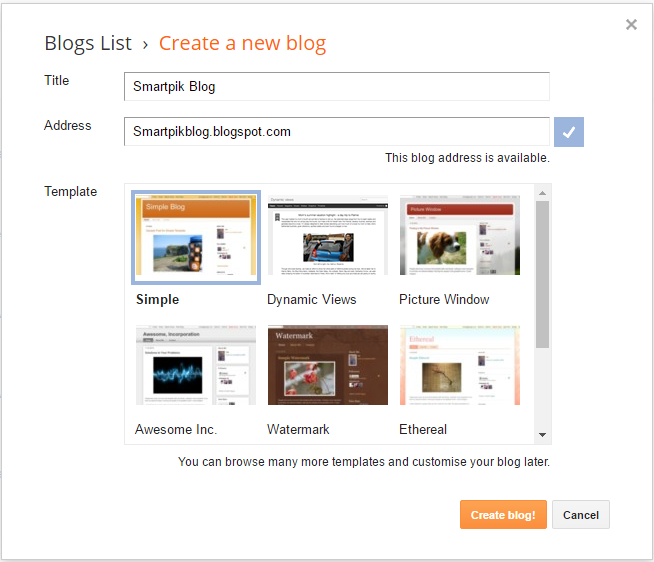
4. Choose your available domain address, your website title  and also choose the basic template which you like ,then click on Create Blog button.


5. Blog Created Successfully

Start Blogging with Blogspot

Now its time to first post on your blog. Let start with an overview of the Blogspot Blogging Platform.

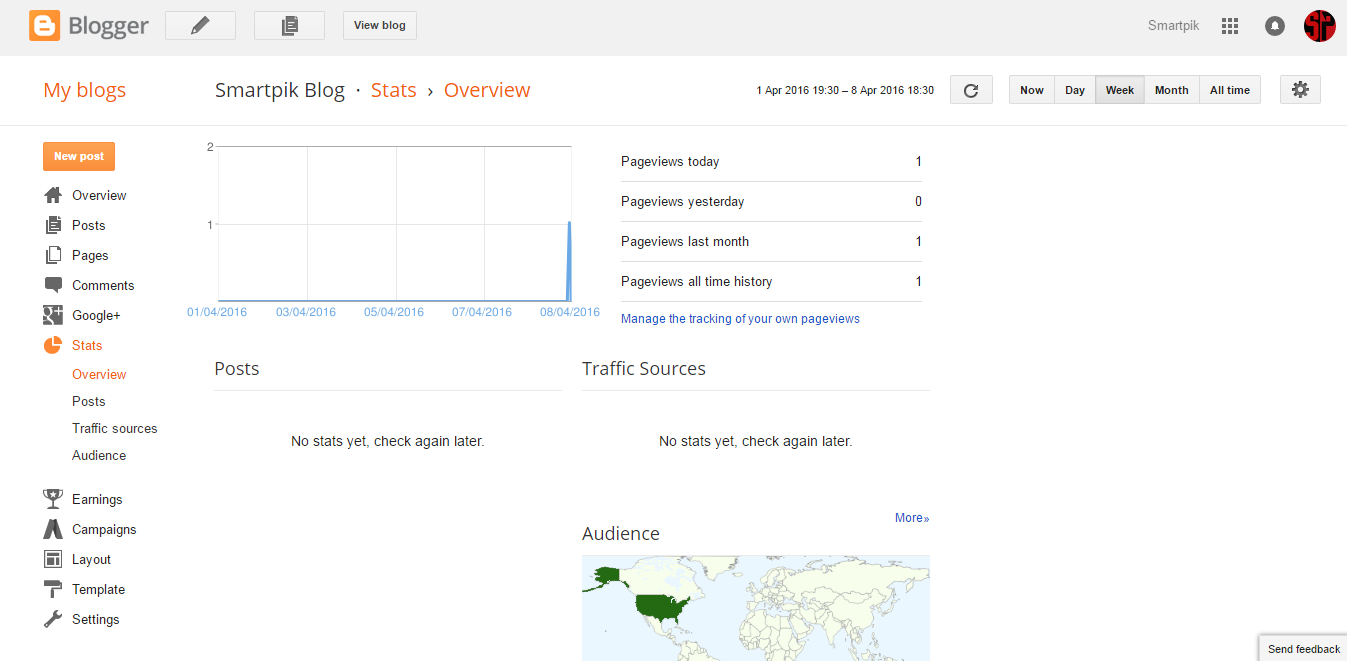
Blogspot Dashboard shows all the basic quick look of your blog information like page views, comments, followers etc.


When you click on Posts -> New Post. there is a full interface for customizing and writing post beautifully which helps to post with no coding knowledge.


You can also add the widgets in the website template layout without coding because Blogspot gives a full user-interface to post a quality article.


Blogspot also gives a fully functional Stats dashboard which shows a well-organized tracking data of the visitors that may help to optimize your website.


You can also edit and customize your website theme as well as backup and restore your template.


And the most important thing, you can also add your AdSense on your blog spot free website.


You can earn from the website where there is no investment needed at all. Best of luck for the new bloggers. Hope you can achieve your goal and make a successful blog.